Wednesday, 30 March 2011

Rhubarb and orange muffins with coconut crumble

Posted by Unknown at 10:48 0 comments
Rhubarb and orange muffins with coconut crumble

Rhubarb is back in season so what better way than to start a week of rhubarb recipes. Rhubarb crumble is a childhood classic which fills some with dread especially those who cannot fathom why sour sweets are so popular. Rhubarb can be difficult to work into sweet dishes as the knack is in adding sweetness without overpowering the sour essence of rhubarb. It must be hard trying to sell the rhubarb taste to children but it is a fruit which offers traditional medicinal benefits.

The first offering is a muffin which is not too sweet but at the same time brings lots of flavour and texture in a form which might appeal to children and adults alike!


Ingredients:

180g dairy-free margarine
180g caster sugar
3 eggs
300g self-raising gluten-free flour
few drops vanilla essence
Grated rind from 1 orange
3 rhubarb stalks

75g dairy-free margarine
75g plain gluten-free flour
20g caster sugar
2 tbsp dessicated and toasted coconut

Prepare the crumble mix by rubbing the margarine and gluten free flour together in a bowl with cold hands. Mrs NMFS has the coldest hands that I know of so hers are ideal! Once you have what looks like fine breadcrumbs stir in the sugar and toasted coconut. Set aside in the fridge until you need it later.

Preheat the oven to 180C and pop 12 muffin cases into a muffin tray. Now to prepare the easy muffin mix.

Cream the margarine and sugar together until soft and light. Slowly add the eggs, one at a time. Add the flour and fold into the mix together with the orange rind and vanilla.

Wash and cut the rhubarb into pieces.

Spoon 1 heaped tablespoon of the mix into each muffin case until all of the mix is used up. Lightly press 3-4 pieces of the rhubarb on top of the mix depending on how large you cut the rhubarb. Spoon 1 even tablespoon of the crumble on top of the rhubarb.


Place in the oven for about 45-50 minutes.


Mrs NMFS's response when I told her of the combination of flavours and as she tried a piece was to say "It's interesting!" I was left to ponder for some time whether that was a good thing or not! Apparently it was a good interesting which was such a relief.


Have you tried a new flavour combination which also interested others?

Saturday, 12 March 2011

Birthday cheesecake

Posted by Unknown at 03:07 0 comments
Birthday cheesecake

It is sunny today! Good weather for a picnic although I have not been outside yet! Going outside has recently been a disappointing experience as the sun plays accomplice to the cold biting wind.

Anywho, I awoke this morning with the task of turning the Vanilla Japanese Soft Cotton Cheesecake into a birthday cake. It will hopefully be a nice surprise as on appearance one would expect a sponge cake hiding inside.


Ingredients:

1 Vanilla Japanese Soft Cotton Cheesecake
350g icing sugar
85g dairy-free margarine
25ml rice milk
few drops of vanilla essence
fresh raspberries
25g white chocolate

Method

Mix the icing sugar, margarine, rice milk and vanilla together until you get a soft and light icing. Cover the cheesecake on the top and sides and smooth the top.

Please raspberries around the edge of the cheesecake. Grate the white chocolate and scatter in the middle.


Friday, 11 March 2011

Vanilla Japanese Soft Cotton Cheesecake

Posted by Unknown at 16:42 2 comments
Vanilla Japanese Soft Cotton Cheesecake

The pictures from the Japanese earthquake were shocking and surreal. It made for both compelling and uncomfortable viewing since it was akin to watching a disaster movie. My thoughts are with the people in Japan who have to deal with this tragedy.

It was by chance that I had planned to make a Japanese cheesecake for my mum's birthday picnic. The combination of a cheesecake and sponge cake has fascinated me so I was keeping it for a special occasion.

Ingredients:


125ml rice milk
300g cream cheese
75g dairy-free margarine
1 vanilla pod
85g plain gluten-free flour
30g corn flour
150g caster sugar
6 eggs
1/2 tsp cream of tartar

Method:

Preheat the oven to 160C. Prepare a 9 inch loose bottomed high cake tin by greasing the sides and lining with baking paper. Cover the sides of the tin with foil as it will be baked in a bain marie.


Pour some boiled water into a pan and in a large metal mixing bowl (bigger than the pan) place the rice milk, cream cheese and margarine. Put the bowl on top of the bowl over a low heat and whisk until blended together and there are no lumps.


Sieve the flour and corn flour into the cream cheese mix together with six egg yolks and the vanilla beans. Whisk together to ensure that the mixture has lots of air.


In another metal mixing bowl, whisk the 6 egg whites and cream of tartar for a few minutes until firm and peaks appear. Add in the caster sugar and whisk again until soft peaks appear.


Fold in 1/3 of the egg whites into the cream cheese mixture and add the rest of the egg whites a third at a time. The mixture should be very airy.


Pour into the prepared tin and place in a baking tin. Pour some hot water on the sides of the baking tin making sure not water gets into the cake tin.


Bake in the oven for 1 hour 20 minutes. For the last 15 minutes, place some foil over the cake to avoid over browning. Leave the oven door slightly ajar and leave the cake in the oven for at least 1 hour. Don't be too alarmed if the cake shrinks around the sides. That is a good sign!

Thursday, 10 March 2011

Sweet potato and turnip doughnuts

Posted by Unknown at 13:07 2 comments
I have a sweet jaw, not just a sweet tooth, but I am mindful of the wisdom of enjoying things in moderation. Judging by my posts, you may be fearing that I eat mainly sweet things. So I decided to redress the balance. If I had two blogs the other one would be called 'No More Rice Cakes!' So in honour of the blog that time does not permit, I will label all savoury recipes under this name.

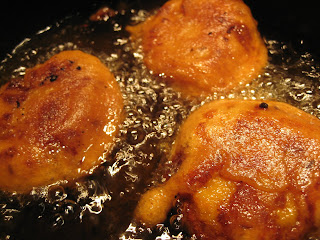
Looking around the fridge I only really had a turnip and sweet potato so I decided to make a variation on a popular Indian street food called vada. They are essentially spiced balls cooked in a batter. Even though they sound sweet, they are deliciously light and spicy.

Sweet potato and turnip doughnuts


Ingredients:


1 large sweet potato
1 turnip
2 garlic cloves
1cm ginger
1 tsp asafoetida
1 tsp turmeric
2 tsp ground coriander
1 chilli

50g gram flour
1 tsp cumin
1 tsp bicarbonate of soda
50ml water

Method:

Peel the sweet potato and trim the turnip and cut into wedges. Boil for about 25 minutes until soft. In the meantime, chop the garlic, ginger and chilli.


Heat some oil in a saucepan and add the garlic, ginger, chilli and cook for 1 minute over a medium heat. Add the asafoetida, ground coriander and turmeric and cook for another 4 minutes remembering to stir. Take off the heat and keep to one side.

Drain the sweet potato and turnip and place in a large mixing bowl. Add the spicy garlic mix, some salt to taste and using a electric whisk, mix together until you have a smooth puree. Take tablespoons of the mix in your hands and shape into balls. Place on a plate and put in the fridge for 45 minutes to cool down and set.


In the meantime, prepare the batter mix by placing the gram flour, bicarbonate of soda and cumin seeds into a bowl and stir in the water.


Heat some vegetable oil in a small pan 5 minutes before taking the sweet potato balls from the fridge. When the oil is hot, place one sweet potato ball at a time and add to the batter to coat all around. Use a tablespoon to do this. Add each ball to the oil, perhaps three at a time, and cook for about 2 minutes on each side.


Drain on some kitchen paper and enjoy the doughnuts with your choice of chutney or ketchup.

Wednesday, 9 March 2011

Choccy nutty biscuits

Posted by Unknown at 11:47 1 comments
It was funny going to the supermarkets yesterday avoiding the frenzy around the aisles stacked up with pancake day ingredients. It is amazing how many special days have been taking over as marketing campaigns and cause so many of us to feel pressured into conforming. It seemed as though alot of people felt pressured into making pancakes yesterday, perhaps out of fear that they might not be seen as the perfect mother/wife if pancakes are not served up. Pancakes are not seasonal, they can be made all year round. I honoured the day by trying a new recipe but will still have pancakes at least once a week. Are we happy that so many days have become marketing campaigns, directing us what we should be buying in order to conform?

So I thought today to make a variation on a favourite which if homemade, can be a bit healthier.

Choccy nutty biscuits


Ingredients:


150g dairy-free margarine
50g caster sugar
200g plain gluten-free flour
300g 70% dark chocolate
200g blanched hazelnuts

Method:

Cream the margarine and sugar together then add the flour until you get a smooth dough.


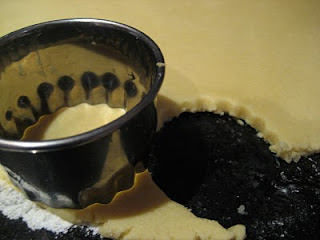
Roll out and using a pastry cutter, cut out rounds and place on a baking sheet.


Place in the fridge for 20 minutes to firm up.


Preheat the oven to 190C and bake the biscuits for 20 minutes. Remove from oven to cool down.


Roast the hazelnuts for 8 minutes and chop into pieces. Carefully melt the chocolate.


Mix the hazelnut with the chocolate and place a spoonful of the chocolate on top of the cooled biscuits.


These are a variation of my chocolate clusters. Add flavours such as lemon, orange to the biscuits and chocolate as you wish.


So fellow readers, are there any other favourites that you would like to make yourself to make more healthy? Custard creams inspired by Nigella are one for sure that will appear soonish.

Tuesday, 8 March 2011

Mango pancakes

Posted by Unknown at 04:29 0 comments
Pancake day and it is sunny again! Although being London it is bitterly cold. My hands and ears have lost feeling so I decided to try something new following on from yesterday's mango custard tart, I decided to try making mango pancakes.


Mango pancakes

Ingredients:


1 ripe mango
250g plain gluten-free flour
1 heaped tsp gluten-free baking powder
1/2 tsp bicarbonate of soda
1 can coconut milk
1 egg
25g dairy-free margarine

Method:

Remove the flesh from the mango and puree (sorry for the slightly iffy photo!).


Sift the flour, baking powder and soda to a large bowl. Add the coconut milk and egg to the mango puree and mix. Add the liquid to the flour and whisk in. Melt the margarine in a heavy-based frying pan and add to the mix stirring.


Over a low heat, cook 2 tbsp of the mix for about 2-3 minutes on each side.


Squeeze with a little lemon juice and enjoy. The pancakes will be sweet already but you can drizzle honey or maple syrup to taste.

So fellow readers, do you make pancakes on pancake day?

Monday, 7 March 2011

Mango custard tart

Posted by Unknown at 14:43 0 comments
It was sunny today! Yes, the sun does exist in London. I was so pleased Mrs NMFS was able to feel the sun on her skin again.  As proof that it was sunny, here are some photos:


Childhood memories inspire so many of our creations, emotions and relationships. Food can be so important. I can remember saving up to have a curly-wurly bar, a chocolate covered caramel whose attraction was its curly intertwined design. A chocolate with curls was so innovative. Looking at the all the blogs out there I continue to be amazed by innovative uses of food. I had two mangoes just crying out to be included on here so I decided to try it out with a childhood favourite, the custard tart.

Mango custard tart


Ingredients:

Sweet pastry

225g plain gluten-free flour
70g icing sugar
Salt
120g chilled dairy-free margarine
1 egg

Mango custard

2 mangoes
200 ml dairy-free cream
3 eggs, 1 egg yolk
1 vanilla pod
4 tbsp honey


Method:

Prepare the pastry first by sifting the flour, icing sugar and salt into a bowl and rubbing in the margarine until you get something looking like wet sand. Add in the egg and knead into a dough. Use half of the dough to line a 8 inch loose-bottomed pie tin. Since the flour is gluten-free it is very hard to roll since there is no gluten to keep it intact. The easiest way to line the tin is to press it in by hand. Once done place in the fridge to chill. The other half of the pastry can be used at another time.Preheat the oven to 180C.


To prepare the custard,  puree the mangoes. Lightly whisk the eggs and yolk in a measuring jug. Heat the cream and honey to a gentle simmer ensuring the honey has melted into the cream. Pour onto the eggs, lightly whisking. Add the vanilla beans and mango puree and mix lightly.


Remove the pastry case, and place in the oven for 20 minutes. Remove and pour the custard mix into the pastry case. You may need to do this whilst the tin is in the oven to avoid spillage. Reduce the oven to 170C and cook the tart for 55-60 minutes.


No More Fruit Salad! Copyright © 2012 Design by Antonia Sundrani Vinte e poucos